
# Building hoses
# New Rubberhose
Hoses are the foundation for everything in Rubberhose and this is the quickest way to create a hose. Click to create a hose group with 3 layers:
- End controller
- Start controller
- Hose
The new hose will be created using the values in the Settings area.
# Path to hose
In addition to creating a new hose at the center of the comp, it is also possible to convert a path drawn with shape layers into a hose, or transfered a vector art path from Illustrator with Overlord.
# Inaccuracies
Rubberhose approximates the shape of the path using hose math. Curves probably won’t be perfect, S-curves will be a little off, and a realism value of < 100% means the bend position will be a little less sharp. After converting a path, adjust it to taste.
# 3 point paths
While it is possible to draw a bendy line using only 2 points and long tangents it is important to draw your path with 3 points. Rubberhose is designed to look for that middle point
# New RubberRig
Rig a set of 3+ layers quickly by parenting them in a chain, select the final layer (a hand, foot, etc), then click. Rubberhose will math up the positions of each layer’s anchor point in order to:
- create a hose with bend points for each layer
- create bones between each bend point
- parent each of the art layers to the bones
Why not path parent each layer to the hose?
Parent to hose is designed to link a layer's anchor point to a hose at a slidable spot. This is useful for attaching elements to hoses, but they will not stretch. Bones stretch between hose points so anything parented to a bone will also stretch.
# The parent chain
The way we communicate to Rubberhose where to set controls and bend points is by first creating a forward kinematics (opens new window) rig where the end of a limb is parented to the next segment, which is then parented to the next segment all the way back up to the root of the limb.
├── Upper arm
│   ├── Lower arm
│   │   ├── Hand
3 layers are required to define at least a start, bend point and end controller.
Why do I need a hand or foot layer?
The creation of bones is defined by the location of anchor points in the parenting chain. The last layer is required to tell Rubberhose where the end controller should be. Without the 3rd layer, Rubberhose would not know how long the last segment should be. You are free to delete it after creating a rig.
# New RubberPin
New in v3.1.0 RubberPins is more intuitive than ever before. Simply add pins to a footage layer or precomp (not a shape layer) and click the button.
Rubberhose will then:
- Create a hose and controller group using your settings
- This new hose will be a guide layers that will not render (it is only used to position all the pins)
- The pins will be parented to the new hose starting with the first pin that is set
# Slide
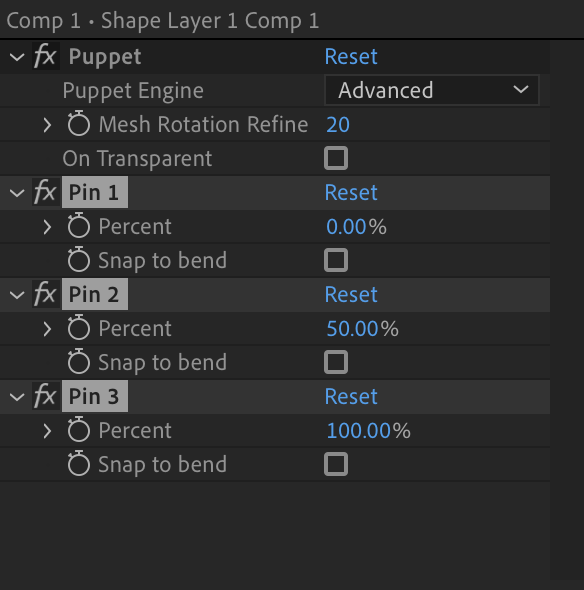
Each pin connected to the hose is positioned along the hose by pseudo effects named Pin 1, Pin 2, etc. This works similarly to Parent to hose, where it is possible to slide the pin along the length of the hose –or snap to a bend point.
- 0% is at the start of the hose
- 50% is at the exact center (this may not be at the bend point)
- 100% is at the end of the hose
# Always raster layers
Puppet pins use a fixed coordinate on the layer to know how to best deform the art. Footage and precomp layers are raster based and have solid coordinates to draw with, while Shape layers are vector based and are constantly redrawing themselves to be infinitely scalable –the same thing happens if you have Continuously Rasterize (☀) turned on.
If you are using pins, do not use shape layers.
If you are using pins, do not use Continuously Rasterize.
# If you want to start with a shape layer, or you need the extra resolution
- Precomp your layer (CMD/Ctrl+SHIFT+C)
- Double click the new precomp layer to go inside of it
- Scale the layer up and make note of the factor you are scaling by
- 200% is a scale factor of 2
- 500% is a scale factor of 5
- Open the comp settings (CMD+Ctrl+K)
- Multiply the comp width and height by the scale factor
- If your width is 1080 and your scale factor is 2, you could do the math, or just type
1080 * 2to update the width to2160 - Do the same for the height or enable Lock aspect ratio
- If your width is 1080 and your scale factor is 2, you could do the math, or just type
- Exit back out to your work comp
- Scale the precomp down to a usable size
- Add pins like usually
- Start rigging
# Supported pin types
There are several pin types now available, but not all of them may be linked to a hose.
| Type | Engine | Support |
|---|---|---|
| Position | Advanced | ✅ |
| Starch | Advanced | ❌ |
| Bend | Advanced | ❌ |
| Advanced | Advanced | ✅ |
| - | Legacy | ✅ |
- Starch and Bend will be skipped
- When rigging with Advanced > Advanced pins the position and rotation properties will both be linked to the hose
What kind of pin type should I use?
Recent versions of Ae have introduced several new pin types, but our personal preference is still Legacy mode with the resolution turned way up. It just feels more hose-like.
The next recommendation is Advanced > Position. This is still pretty simple but can require some Starch pins to bend smoothly. But using starch pins can provided some additional flexibility with how the art bends.
The 3rd option is Advanced > Advanced but we have not noticed any additional flexibility, but if you find some cool ways to use it, let us know.