
# Managing rigs
# Duplicate
Most creatures are fairly symmetrical, so once a hose has its bend values or style dialed in, quickly duplicate a hose, controllers and any path parented layers for the other side.
- Select a hose
- Click
- A popup will allow you to rename the new hose group
- The hose group will be duplicated with the same properties as the first
# Duplicating layers natively
A hose group is an interconnected bundle of names and math that tells the system how to draw things, but what happens if you duplicate individual Rubberhose layers (CMD/Ctrl+D)?
- Hose - Dup hose layers are still connected to the controllers. This is useful for more complex compositing or styling.
- Using the duplicate as a matte
- Adding textures between parts of a hose
- Controllers - Dup controllers are not connected to anything and will not change the shape of any hose layers
- Bones - Dup bones are still connected to their bend points. It is also possible to manually adjust the bend point they are linked to with the Point select pseudo effect on the bone layer.
# Rename
In previous versions of Rubberhose, layer naming was very important and affected everything about how the expressions worked. This is no longer a concern and you are free to name layers as you please without fear of orange expression errors.
But for a more organized approach to layer naming this button allows for batch renaming all layers that make up a hose group.
- Select a hose
- Click
- A popup will allow you to rename the new hose group
- All expressions will be adjusted to use the new layer names
# Add bend
Multi-bends are a major improvement in version 3 and flexibility is the core Rubberhose ethos. Duplicating one of the RH Bend pseudo effects will add a new bend point, but it will be at the same position as the original. To add bends with more visual feedback use this button.
- Select a hose
- Click
- A new bend point will be added to the hose and any existing bend points will be distributed (Slide) evenly across the hose
# Modifier key: SHIFT
Holding down the SHIFT key will add additional bends after the last bend on the hose, but will not redistribute each bend’s (Slide) property. Instead it will subdivide the remaining area of the hose.
If there is a bend at 50%, holding SHIFT will create a new bend at 75% (half the distance between 50% and 100%)
# Parent to hose
New in version 3, Parent to hose allows any layer to be attached to any part of a hose. This is a powerful way to add elements like watches and jewelry that are too complex to be built from shape layer operators.
- Select a layer (not a hose)
- Click
- A popup will ask you which hose to connect the layer
Keep in mind that that layers that have been hose parented do not deform with the hose. Their anchor points are fixed to a point along the path and move/rotate with the hose, but the do not stretch.
For stretching art like a texture or a tattoo along segments of a hose, use RubberRig or parenting to a bone layer.
- Select a layer (not a hose)
- Click
- A popup will ask you which hose to connect the layer
# Modifier key: SHIFT
Holding down the SHIFT key will disconnect the selected layer from the hose, returning it to its previous position and rotation. The Parent to hose pseudo effect will not be deleted in the event that you wanted to reattach the layer to a hose.
# Parent to hose controls
If you look a little closer at the selected layer, you’ll notice that the button name (Parent to hose) is a little misleading. There is no actual parenting happening. Instead, it is adding expressions to the position and rotation properties that are controlled by a pseudo effect.
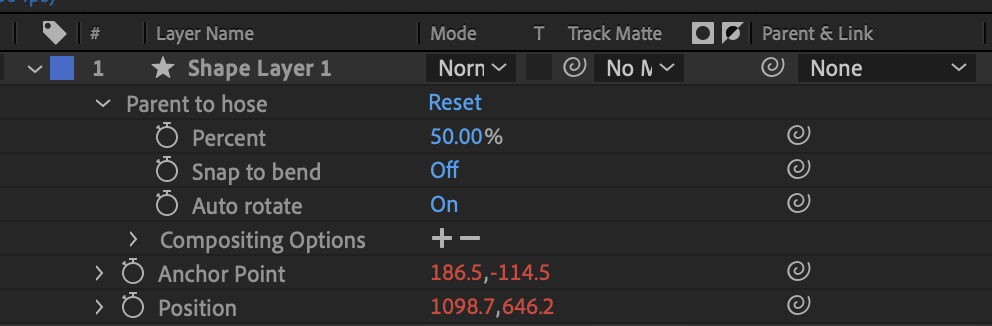
- Percent: the position along the hose to attach the layer. This defaults to 100% because this is where hands and feet are located
- 0% - the start controller
- 50% - the mid point of the hose
- 100% - the end controller
- Snap to bend: Force the layer to always stay attached to a bend point. (default off)
- Why? Because of the stretchy nature of hoses, bend points are not always located exactly at their slide % value.
- Jittery rotation? Add 1-2% of roundness to the bend point. Without getting too math heavy, the rotation calculation is defined by the tangent handles of the bend. If the bend point has 0 roundness, that means the tangents are zero and nothing to drive rotation.
- Auto rotate (default on)
- For most art (like a watch on a wrist) you would want this on so it rotates with the hose
- For a few situations (like fringe hanging off a really cool jacket) you might not want it to rotated with the hose
Yeah but why aren’t controllers auto-rotating?
It’s gone. Hose parenting has increased accuracy and renders faster. You can still parent a layer to a controller, but it will not auto-rotate.
# Add bones
- Select a hose
- Click
- Bone layers will be added between the controllers and bend points
# What are bones?
Bones are invisible layers (guide layers that do not render) that move and stretch between bend points. They are used as parents for additional art layers (something too complicated or irregular shaped to be created with a hose style).
This process happens automatically with RubberRig but is available here as its own button to give you the freedom to add a bone to a hose and parent as many or as few art layers to a hose to customize the look of a limb.
# Autoflop
Originally designed in v2 to be quick way to ease between positive and negative Direction, Autoflop has been given a major upgrade to handle foreshortening and limb crossover.
- Select a hose
- Click
- A new Autoflop pseudo effect will be created on the end controller
- An invisible Autoflop visualizer layer (guide layers that does not render) will be created
# Controls
The Autoflop pseudo effect on the end controller is what defines the behavior of the Autoflop.
- Enable: Turn the Autoflop on and off. This property is keyframable.
- Angle: On the visualizer layer you will see a small arrow. This is the direction the Autoflop math will attempt to force positive direction bends.
- Falloff: Whenever the end controller enters the pink area of the visualizer, the Autoflop behavior will increase until it hits the darker center line, and then will begin decreasing. Increasing this value will increase the distance of the effect.
Transition too quick?
At the start controller position, the falloff area is the most narrow. That means the closer an end controller moves to the start controller, the quicker the Autoflop transition will take place.
Move the end controller a little further away from the start controller to smooth out that transition.
# Removing Autoflop
The Autoflop visualizer (the pink hourglass looking thing) is only a visual representation of how the math will work and may be hidden or deleted at any time without affecting the Autoflop behavior.
To remove Autoflop from a hose group:
- Select the end controller
- Locate the Autoflop pseudo effect
- Delete it
# Toggle controllers
Take control of the visual noise that may come from adding more hose groups to a comp by hiding and showing controllers. There are a few options based on selection and keyboard modifiers.
# With no layers selected
- All controllers will be toggled based on the visibility of the top most controller
# With layers selected
- All controllers that are part of selected hose groups will be toggled visible or invisible (like clicking 👁️)
# Selection soloing: SHIFT key
- All controllers that are part of selected hose groups will become visible
- All other controllers in the comp will become invisible
# Opacity toggle: Alt/Option key
Instead of toggling 👁️, toggle controller opacity between 100/0%. This hides the controller from view while keeping motion paths visible.
# With no layers selected
- All controllers will be toggled based on the visibility of the top most controller
# With layers selected
- All controllers that are part of selected hose groups will be toggled visible or invisible (like clicking 👁️)
# Toggle style
Hose styles may contain a lot of shape operators and could gradually slow down the comp preview. Batch toggle the hose styles in the comp to speed up render time to a comp or see how a hoses are actually bending.
# With no layers selected
- All hose styles in the comp will be toggled with a basic stroke
# With layers selected
- All hose styles in the comp that are part of selected hose groups will be toggled with a basic stroke
- All controllers that are part of selected hose groups will be toggled visible or invisible (like clicking 👁️)
# Select group
Controllers and hose layers do not need to be near one another in the layer stack to work correctly and sometimes stacking all controllers together can make it easier to animate. This button is used to locate all layers in a selected hose group.
- Select any number of hose or controller layers
- Click
- All layers that are part of selected hose groups will be selected