
# Workflow
# Quick start
Click the puppy dog button to export and compress to MP4. That's about it.
# Anubis process
(What happens when you click the puppy dog button)
- The open comp, timeline or sequence in After Effects, Photoshop, Animate, or Premiere Pro will first be exported to disk as a full-resolution MOV/AVI
- It is also possible in Ae to select multiple comps in the Projects panel to batch export
- This large video file will be processed using the Options below ↓
- The compression progress will be displayed at the bottom of the Anubis panel
- Once that is complete your brand new
.mp4file ready to view
# Additional uses:
- Export and send to another app (new in v1.1)
- Drag and drop a .gif or .mp4 to recompress using rhe current Anubis options
# Options
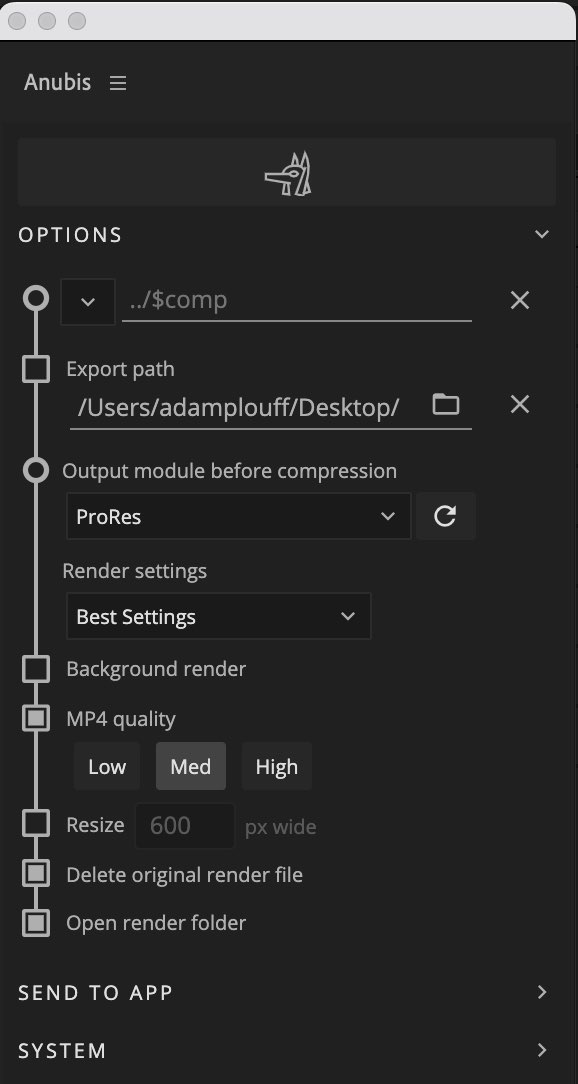
# File name
This field updates automatically to reflect the comp, timeline or sequence name. Overwrite the output file name by entering text.
# Naming tokens
New in v1.1, Naming Tokens are a powerful way to generate dynamic file and folder names for each render. The [ v ] dropdown will present a list of common tokens to insert into the file name field.
File name incrementing
To avoid overwriting files, each additional file exported with an existing file name will have an incrementing number appended to the end of the file.
# Export path
With no folder selected, Anubis will ask where to save files on each export.
Click to set a folder path for Anubis to export to each time.
# Relative path from Ae project (After Effects only)
Within After Effects, the Export path may be switched between rendering to a defined folder path, or relative to the current After Effects project file. This is a valuable workflow for projects that utilize a consistent folder structure.
# Relative to the project folder
- A relative path of
./would export to/ProjectFolder/Ae/–the same location as theCurrentProject.aepfile - A relative path of
../Exports/From-Ae/would export to/ProjectFolder/Exports/From-Ae/
Imagine you have a project folder that looks like this:
├── 📂 ProjectFolder
│   ├── 📂 Ae
│   │   └── CurrentProject.aep
│   ├── 📂 Assets
│   ├── 📂 Docs
│   ├── 📂 Exports
│   │   ├── From-Ae
│   │   │   └── CurrentProject.mp4
# What is this ./ stuff?
This might be completely new and that's ok. This is a short-hand for how computers view folders and their relation to one another. This is how Anubis knows how many folders to go up and over to save files.
/   = System root directory
./  = Current (AEP project folder) directory
../ = Parent of current (AEP project folder) directory
../../ = Two directories up
# Relative paths in tokens
It is also possible to add relative path notation in the file name name field. This is is useful if you prefer to flexibly render to a defined location, then navigate up a number of folders.
# Output module (After Effects only)
Ps/An/Pr will output an high quality MOV or AVI by default but Ae uses the render queue to define the file type exported. Select a high quality codec like Lossless or ProRes.
See Color Accuracy for more about output modules.
Click ⟳ to reload the available Output Module and Render Settings.
# Render settings (After Effects only)
This defaults to Best Settings, but some projects require custom settings. Pixel art might benefit from Draft Settings.
# Background render (After Effects only)
New in v1.1, enabling this option will allow you to continue working in Ae while files render in the background.
The process:
- The active comp (or multiple selected comps in the project panel) will be added to the render queue
- The
.aepfile will be saved - The background render system will be launched and progress will be displayed at the bottom of the Anubis panel
- Upon completion, Anubis will compress the file(s) with the defined settings
# MP4 quality
Compression may be set to Low, Med, or High. These settings define the quality and file size. Select one or all of the settings to output multiple quality files.
Disabling this checkbox will export the larger sized video file without compressing an MP4.
Custom quality settings (advanced)
We think the default values have been tuned pretty well, but it is possible to set custom values for each of the presets if you are cool with a little bit of nerd work.
See Custom quality for the process.
# Resize
New in v1.1, it is now possible to resize the compressed MP4 to a certain pixel width. This is common for embedding video files on a webpage at a consistent resolution or when file size is a consideration for sharing with others.
The height will scale proportionally to the width so only one dimension is necessary.
# Delete original render file
Before compressing, there will be a large video file generated. With this option enabled, the high-quality source file will be deleted from disk after compressing the MP4.
Disable this option to keep both the MP4 and source video files.
# Open render folder
Enabling this checkbox will open the output folder in Finder or File Explorer to make finding your file easier. Don't feel bad if you lose your files too.
# Send to app
New in v1.1, it is also possible to render/compress then automatically import the new file into one of the other supported Adobe apps (After Effects, Photoshop, Animate, Premiere).
Click one of the buttons available buttons to export and compress using the above settings, then Anubis will:
- Open the app you are sending to (if it isn't already open)
- Import the new file into the open project
- It will create a new project if one isn't open in Ae, Ps, An
- If a project isn't open in Premiere it will stop here. There are too many project settings to define to automate this process.
- Add the file to the current timeline
Alpha channel support
From After Effects, it is possible to disable MP4 compression and render a full-resolution video file with an embedded alpha channel (using Animation, ProRes 4444, etc). With Send to App it is possible to import this render into Premiere and Photoshop.
Note: Animate does not support these higher quality video files and requires MP4s.
# Export range
The range of an exported video may be defined by setting the work area of timeline in After Effects, Photoshop and Premiere.
# After Effects

# Photoshop

# Premiere

# Animate
While Animate has a loop range to set the playback area, these points are not visible to 3rd party developers. To select a range smaller than the full Animate timeline, select frames directly and the first and last frames will set the start and end of the export.

# Drag and drop
Drag and drop files into the Anubis panel to recompressing video files or gifs using the Anubis compressor.
New files will be created at the origin file path. The enabled compression settings within the panel (MP4 Quality, Resize) will be used but the anything related to rendering from the Adobe app (Output module, Background render, Delete original render file) will be ignored.